To get a better idea of catalogue import, you can give it a try. This will allow you to see how CSV files turn into new products in your Netcash Shop and how existing products get updated.
Step 1. Import test products
Let’s start off with importing a ready-made file with two sample products.
- Download the Sample CSV file that we’ve prepared for you.
- Now upload this file to your store: Go to catalogue → Data Import & Export in the store admin, click Upload catalogue File, and select the CSV file you’ve just saved.
- On the opened page, click Start Import and wait until importing is complete. You’ll see a green notice in the top right corner of the admin.
- Go to catalogue → Products and find the products from the file there.
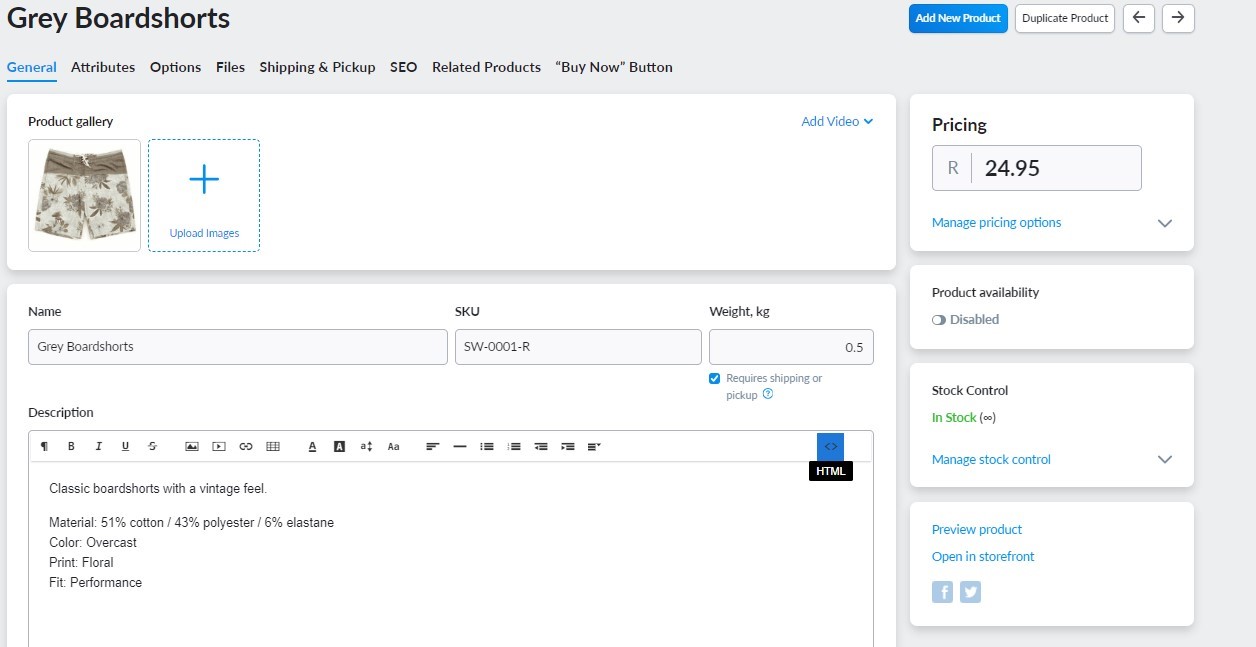
Here’s how the “Grey Boardshorts” product will look in your store admin:

Congrats! You’ve added two test products to your store via import. Don’t worry, customers won’t see them. Our test file is built to create products in a disabled state.
Step 2. Update test products
Now let’s update the products you’ve just created. Say change the price for “Grey Boardshorts” to “R21.90” and the weight of “Multicolor Boardshorts” to “1”. For that, we’ll adjust their CSV file and import it again.
1. Open the CSV file you’ve downloaded in Step 1 in any spreadsheet editor. For example, that’s how you do it in Google Sheets:
Learn how you can open and save CSV files in Excel, Google Sheets, or Numbers →
2. Find the “product_price” column and enter “21.90” in the “Gray Boardshorts” row:

3. Find the “product_weight” column and enter “1” for the “Multicolor Boardshorts” product.
4. Save the file as CSV to your device. In Google Sheets, by clicking File → Download → Comma Separated Values (.csv).
5. Go to catalogue → Data Import & Export in your store admin and upload the file you’ve just saved.
That’s it! The products are now updated.
You can go and check on the changes in the catalogue → Products page.
Step 3. Export, adjust, then import back
If a product already exists in your store, you can export a CSV with its data, edit the file and then import back to update the product. This way, you can save yourself time on creating CSVs.
- Go to catalogue → Products, tick a product (or products) you want to update, and click Import or Export Products → Export Selected.
- A CSV file will be downloaded to your device. Open it in your spreadsheet editor.
- Enter new values into the corresponding columns.
- You can delete the columns you don’t update, but make sure you leave “product_sku” and “product_internal_id”. They let the import tool know which product the data is for.
- Save the file as CSV to your device.
- Go to catalogue → Data Import & Export in your store admin and upload the file.
That’s it! You’ve updated your product(s).
Go check it out in the Catalogue → Products page.
Next: Create your own file
Now you have a better idea of how importing works and can start building your own CSV files.
– Check out the CSV structure used in your store
– Create or edit a file according to it
– Save the result as CSV
You can use one of our Sample files as a basis.
Further reading
Best practice for importing CSV files →
Exporting your store catalogue →
Import reference:
Format guidelines for the CSV file →
Step-by-step guides:
Catalogue import case studies →
– Download Boardshorts.csv
– 810 Bytes